Saturday, December 26, 2009

Snowed In!

Good morning, Stampers! I trust everyone had a fabulous Christmas. I sure did, despite being snowed in. We had 14" of the white stuff in the OKC metro on the 24th. While that may not seem like mammoth amounts to some of you, you would have to know that we only have a few snowplows for the whole state! Most everything is closed down if we get much more than 2-3" here. Here's a picture from my front door and one from the driveway.


Enough about snow. I wanted to show you what I made for our office gift exchange.


I also made her one of my "white boards" with the Upsy Daisy image. I used her favorite color and personalized the scratch pad holder with her first name. I thought it made a nice gift and several of the ladies oohed and aah ed over it.


Well, stampers, I have swap cards to make that absolutely HAVE to be in the mail (and overnight ed) by Monday. It has indeed been the season for procrastination! I have one of the two cards designed, but that's as far as I've gotten. At least I have all of next week off to enjoy time with my family before heading back to work!


Enjoy your weekend and remember, if I can stamp, you can, too!

Saturday, December 19, 2009

Dry Erase Tiles

I have had several emails asking me for directions on the tiles I posted yesterday, so .... I thought I'd post the directions here for all of you!

I used glazed tiles that measure 6"X8" from the local hardware store. I rubbed the tile with my Embossing Buddy so I didn't have extra EP stick to the tile. (If this does happen, you can scrape it off with a razor blade/craft knife.) Next I stamped my tile with the image and Classic Stampin' Pads. I have discovered that line images work better than bold images as the bold images tend to look "gloopy". You do have to be very careful to stamp straight down and lift straight up because the ink will smear pretty easily since the tile is glazed. However, if you do have a smearing situation, the ink will wipe right off with a little spritz of Stampin' Mist and a paper towel (which is why you HAVE to use embossing powder on this project). Once you have your image stamped, sprinkle with clear EP and tap off the excess. (I blew on mine after that, just to be sure all the excess had been removed.) Then heat in a 350 degree oven for 10-15 minutes. Remove with pot holders as they will be VERY hot. I put mine on racks to cool and they did this much more quickly than I though they would. It took about 15 or so minutes for them to be cool enough to handle. I then tied some ribbon around them and set them in the little easels I bought at the dollar store.

OH! I covered the dry erase markers with DSP and/or copy paper stamped to match the color of my image while the tiles were heating/cooling. I used 2 stips of Sticky Strip to adhere the paper to the markers. Voila! A quick gift that looks great! And the great thing about these is you can get several of them ready all at once and stick them in the oven together!

I'd love to see what you create. If you make one of these, please link back to this post so I can see! :) Enjoy creating.

Friday, December 18, 2009

'Tis the season...

To be BUSY!!! Sorry I have neglected you guys for so long. I have been busy both creating and with life. Here's a couple of samples of a project I've been working on. I hope you like them. They are really quick and I know I use one on a daily basis in my own home! The first one is done in Pacific Point (last year's In Color) and Country Morning a Level One hostess set. The second one is done in Melon Mambo and one of last year's SAB stamp sets that I still love, Polka Dot Punches. I whipped up 5 of these in less than 1 hour. If you want more details, just email me!


Wednesday, December 2, 2009

RETIRING STAMP SETS

Just this morning Stampin' Up released a list of stamps on the Dormant List that will retire on January 4, 2010. These stamps are still available in limited supply. If you see one you'd like to own, contact me or place your order online. I'm including a list of the stamp sets. The stamps sets can be seen on my website, tory.stampinup.net or email me and I'll be glad to email a PDF document with pictures of the stamp sets. If you have any questions, feel free to email me or give me a call.

Contact me to order your retiring stamp set and recieve 10% off the purchase price (tax and shipping will be calculated on the full price). Shipping is 10% with a $6.95 minimum. Email me at tabray@sbcglobal.net or call me to place your order!


Item Number Stamp Set
113407 Back Woods
114492 Beautiful Baby
114486 Birthday Wish
113200 Branch Out
114496 Celebrations
113732 Central Park
113206 Classic Sketches
113226 Classy & Fabulous
114498 Flowers in Silhouette
113405 Font of You
113216 For the Bride
114494 Forever
109425 Friend by Definition
114488 Fun Flowers
113716 Garden Greetings
114490 Glad Friends
111580 Grand Soiree
113242 Hit the Road
113710 Lexicon of Leaves
113236 Man's Best Friend
114423 Ocean Commotion
113728 Playful Petals
109276 Polka Dot
111544 Putt Putt
113240 Quilt Quips
113754 Really Retro
113403 Sip by Sip
113726 Sweet Stems
113250 That's Funny
113688 Wonderful Watercolors
114028 Para la novia
114032 Acuarelas Maravillosas

For best selection, order early.

Saturday, November 28, 2009

As promised, my Christmas card

Good morning, Stampers. I hope everyone had a wonderful Thanksgiving! I sure did! We cooked and ate and visited. Yesterday DH and I hit the sales at 4 am. I couldn't believe that most of the items we wanted were ALREADY GONE!!! Oh well. I guess that is just God's way of saying, "You really didn't need that, anyway."

OK. I remember I promised that I would show you my Christmas Card. I have to tell you that the inspiration came straight from Stamping 411 Sketch Challenge #125.

So, here's the card.


They really do have some great sketches. You should check it out at stamping411.blogspot.com.

Well, I am off to do chores so I can put up the Christmas tree today. And spend some time stamping this evening!

Have a wonderful weekend, and remember, if I can stamp, you can, too!

Tuesday, November 24, 2009

LOTS to Share

Hellooooo, Stampers! I hope you are having a wonderful week. Are you ready for Thanksgiving? I'm sure looking forward to family and food. Those are only 2 of the many things I am thankful for. You guys are another of the many!

Do you believe I have LOTS to share with you today! The first thing is that Stampin' Up! is having a GINORMUS SALE!!! Items are 30%-50% off now through November 30. Visit my website (Tory.Stampinup.net) for a list of items. Just click "Shop Now" and then choose Online Extravaganza. You can order online or you can call me and I'll be glad to place your order for you! There are some great bundles and some great solo items. You really should check it out!


The second thing I have to share is that I am holding another Christmas Gift Extravaganza class on December 5th. Thanksgiving will be over and Black Friday behind us. I'm offering several quick and affordable gift ideas for you to finish up your gift giving list. The cost of the class is $20, BUT mention that you saw it on my blog and receive a 20% DISCOUNT!!!

Learn to make this cute little box and a stamped candle to go inside, a goodie basket for your own yummy Christmas treats, a Luminary with a flameless candle included to light it up, and finally, the piece de resistance: a write-on/wipe-off tile with an easel and matching dry erase maker in MELON MAMBO! That's right! I have figured out that you don't have to use craft ink to stamp on glazed tile. Of course there is a trick to stamping on glazed tile, so you really need to come to the class to learn how to make these lovely gift items! Only 8 seats available, but I am offering 2 sessions. Saturday December 5 from 10 am - noon and again at 2 pm - 4 pm. If you are in the OKC metro area, call or email me to reserve your spot! 799-2335 or tabray@sbcglobal.net.


Finally, I'm happy to say that I did finally get my personal Christmas cards designed! I'd show you now, but I need to save SOMETHING for this weekend!

I hope each and every one of you have a happy and blessed Thanksgiving.

Sunday, November 15, 2009

A couple of cards


Hello, stampers. I finally had a few hours this week all to myself for stamping. I made this card for DS2 for his birthday today.
It was fun. I stamped the cute little cake in chocolate chip and then used clear EP on the top half (with versamark) to make lovely shiny "frosting." The white "brads" were made with my crop-a-dile and attached with slivers of Dimensionals. I added the punch out on the scallop border, also with the crop-a-dile.


I also had time to make these cards for a friend that helped us some of the grueling chores we've had the past few weeks.

I thought it would be nice to say "thank you" with a gift of 8 Christmas cards and envelopes. I made 4 of each and tied them up with the envelopes. He seemed to appreciate them.

I guess my next task should be creating my own Christmas cards for this year. Boy am I behind!!!! Oh well, nothing like a little pressure to get those juices flowing! Maybe I'll have at least one done by the next time I have the time to post.

Gotta run. Remember, if I can stamp, you can, too!

Thursday, November 5, 2009

WHEW!!! What a couple of weeks!


Hi, stampers. I know I've been MIA for a while. Life was busy. But I'm back tonight and I have a surprise! I finally got my copy of My Digital Studio and I have to say IT ROCKS OUT LOUD!!!


Here is my card that I made to complete my certification.
I'm here to tell you that this is one EASY program to use. I've made this card, started a calender, and only have one more quiz to finish my certification! It's been a blast!

Let me know what you think. I can hardly wait to get my card from Stampin' Up!'s professional printing service! I can't wait until I have time to make more cards and finish my calendar. It may just be a Christmas gift for my DH!

Well. it is late and I have been working my little fingers to the bone (if only it had all been on stamping and MDS...) Ah well, such is life. :)
Leave me a comment and let me know what you think of my first digital creation!

Sunday, October 18, 2009

Christmas Gift Class


Hello, stampers! I am offering my first class. It will feature 4 FAB-U-LOUS gift items. This class will be on November 7 for a cost of $20. I hope you can see the items in the picture. We will be making a Luminary, a Write-on/Wipe-off Board, a Goodie Basket, and Yvonne Brannen's Candle box. It's going to be SO much FUN!!! Register by October 30 by clicking on the BUY NOW button on the right and choosing the session you'd like to attend. Each session is limited to 8 seats, so register for you place today! Your payment is your registration. If you don't have a paypall account, email me for other payment options! If you are in the OKC Metro area, I'm really excited about seeing you at this class! Remember, prepaid registration is only through October 30 so that I can order the supplies for all your projects.


Cancelation Policy:
If you register and then cannot attend, all supplies and instructions will be available for pick up on or after 11/8/09.

Sunday, October 11, 2009

SSC120


Ok. I think I am feeling better today, even though I'm not sure I'm happy with this card I made for Stamping 411's Sketch Challenge 120. I started with a cardbase of Old Olive, then, (here's the tricky part....) I took an old piece of cardstock and covered it with aluminum foil from my kitchen and ran it through the Big Shot with the Petals-a-Plenty folder. Cool, huh? Then I took some Riding Hood Red and stamped one of the Delightful Decorations stamps in Vers-a-Mark and heat embossed it with silver ep. I then added a sentiment from Teeny Tiny Wishes and punched it out with the word window punch and layered it on the Modern Label punch. Finally I added 3 silver brads and attached to my dry embossed piece, added some Riding Hood Red ribbon and here it is. Let me know what you think. I'm not sure what about it leaves me wanting, but.... Your comments may just help me figure it out! Until next time, remember, if I can stamp, you can, too!

Saturday, October 10, 2009

Another Week......gone


That's how it seems today. Another week already gone! We started with the wonderful rent house to deal with, and then DD got sick. The doctor said it was the flu. About the time she started feeling better, I got sick. The doc says it ISN'T the flu, but boy have I felt lousy! I did manage to get enough energy together to get my next workshop's project samples done. It's a Holiday themed workshop.
I've decided on a "place setting favor" for Thanksgiving, a cute little basket for some Christmas goodies, and a frosty, spinning, Christmas card. The hostess had requested a spinner card with snowflakes.
I'm not sure who's original idea the basket was. I saw it here and the template is on the SU! demo site. Of course then I tweaked it a bit as I personally don't like templates. I changed the dimensions just enough to cut and score without a template, but I'm sure it is fabulous just the way it was!
Pillow Box
Cardstock - Rich Razzleberry, More Mustard, Old Olive
Ink - Chocolate Chip
Accessories - 1/4" Grosgrain in Chocolate Chip
Stamp set - Holiday Best (level 1 hostess gift)
Card
Cardstock - Whisper White, Brocade Blue
Ink - Night of Navy, VersaMark
Accessories - White Organza Ribbon, Silver Elastic Cord, Silver EP, Dimensionals, pennies :)
Stamp set - Snow Swirled
Basket
Cardstock - Old Olive, Real Red
Accessories - gold brads, Sleigh Bells Ribbon
I hope I haven't left anything off. I'm still felling pretty icky. Hope you all stay healthy and happy and stamping!

Monday, October 5, 2009

WCMD


Last week was very stressfull!!! Our renters told us they were moving 4 days before they moved. AKKKK!!! It wouldn't be so bad if the rent house didn't have a mortgage on it. Oh well. I know God is in control and I am NOT going to freak out.


I did get to take some time to stamp on Saturday. My mom invited some of her friends and neighbors to her senior community's club room to make some cards to donate to our soldiers.

Here are the cards we made. The 3rd one should look familiar since it is the same card I made here but with different colors. I wanted something a bit more cheery. The Ice Cream card was actually designed by my upline, Conne Stewart.
I think everyone had a great time and we made 23 cards to send to the soldiers to write home on. We also made 8 cards to thank a soldier for their service. I will get these off to Operation Write Home this week so they can be put to good use.
Thanks for stopping by. Untill next time!

Saturday, September 26, 2009

This week's LNS challenge


Our challenge this week was to make something using our chalk pastels. I made this card. I stamped my rooster with Basic Brown and then colored him in with chalks and a Blender Pen. I thought he turned out pretty. I added a bit of piercing in two of the corners for some interest and mounted that on Chocolate Chip. My nifty background paper is Creamy Carmel stamped with the Sweet Swirls wheel and Chocolate Chip ink. I added some gold brads, some Very Vanilla 1/4" ribbon and the sentiment from the same stamp set as the rooster, Country Morning, which is a level one hostess gift. I hope you like it. I was going for a rustic look. Let me know how I did and remember, if I can stamp, you can, too!

Thursday, September 24, 2009

Trick or TREATS!

I wanted to share a quick and cute treat holder I made for a group of ladies to put together the other night.  They are newer stampers and just loved this idea.  I loved the treat holder on page 10 of the Holiday Mini, but do not own that die, so I improvised, changed the decorations and colors and VOILA!


We decorated with punch art rather than stamps as I am sadly lacking in Haloween stamps.  I thought they turned out cute.  I think a couple of the ladies liked them, too, since I overheard one tell the other that SHE was making them for the office.

We all had a great time.  I look forward to stamping with that group again soon!

Until next time, remember, if I can stamp, you can, too!

Saturday, September 19, 2009

Sweet Medallion Cards


Sorry I've been MIA the past 9 days. I have just been so busy! I had my SU! Open House last Saturday and have been getting ready for my first "real" workshop that is on Tuesday.
I had ordered the Sweet Treat Cups and while I was waiting for the Man in Brown to bring them to me, I had a crazy idea. Why not put them in the center of the Medallion Stamp? I've seen a lot of Medallion projects and a lot of Sweet Treat Cup projects, but had yet to see the two combined. So...(Yes I did notice that the Medallion is off center on the first image...but not until I had everything glued into place...) What do you think? Crazy or ingenious?
Edited to add: Since the center of the Medallion was close to one edge, I was able to use the 1 3/4" Circle punch to make the cut out for my treat cups. The Christmas card has curling ribbon and a couple of jingle bells in the cup.
Later!
Tory

Wednesday, September 9, 2009

Pumpkin Basket


I've been meaning to try one of these cute pumpkin baskets made out of the pillow box die, and I finally found time today. I first saw this design on Gretchen's blog and she stated she found it on Lynn Putt's blog. It was a lot of fun to make. I changed the face to yellow as if it were lit from within and to work with bits and pieces of punches that I have. My DD oohed and ahhhed at it, so I guess I did alright. LOL Until next time!

Tory

Saturday, September 5, 2009

3-D Project


Hello, Stampers. I hope you had a lovely Saturday. We were very busy around here, so I took some much needed R&R tonight and created a fun little project that's NOT a card. It is a holder for sticky notes and a cute little pen. How many times have you wished you had a sticky note with you. Well now they won't get all bent or come apart in your purse! Too easy, too!


I started with a piece of card stock 8 1/2" by 3" (my sticky notes were 3"x3"). I cut off a 3" by 1/2" slice (for the pen holder) scored at 2", 2 1/2", 5 1/2", and 6". I then stamped and embellished as desired, folded the 1/2" by 3" strip in half around the pen and used Sticky Strip to hold it together and to stick it to the inside body of the holder, used Sticky Strip to attach my note pad, added a stick-on a loop-and-hook closure dot (I had to trim one edge of it off so it didn't show) and there you have it. Easy Peasy! And cute to boot! I have lots more work to do around the house this weekend. I'm having an SU! open house next Saturday, so if you are in the OKC metro area and would like to drop by between 10 and noon, drop me an email for directions! I'd love to show you some of our fun new products and to let you see for yourself that if I can stamp, you can, too!

Sunday, August 30, 2009

411's 114 with Dasher


Hello, Stampers! Here is my entry for Stamping 411's sketch challenge 114. I got this stamp recently and haven't had a chance to use it. I saw this challenge and thought it to be the perfect opportunity. I do see that I need to work on my photography skills as the whole top of the card looks crooked. I promise it really isn't! LOL
I stamped Dasher with Versa Mark on Night of Navy and heat set him with white EP. I then layered on a torn piece of SAB DSP that has always looked like snowflakes to me, added a sentiment from Teeny Tiny Wishes (also white EP) and a Night of Navy faux bow. Quick and easy. Just the way I like them!

Monday, August 24, 2009

Monday Lunchtime Sketch Challenge #84


I decided to give the Monday Lunchtime Sketch Challenge a try from over at TechnoStamper's blog. I don't know why I haven't ever done it before. It was a lot of fun. I did turn her sketch upside down, but I'm sure she won't mind.
Card stock: Dusty Durango, Soft Suede, Whisper White
Stamp Set: Circle Circus
Ink: Soft Suede, Dusty Durango, Crushed Curry, Bermuda Bay
Accessories: Texturz Plates, Scallop Circle Punch
You should head over to Mary Jo's blog and give it a whirl yourself. I'm pretty sure that if I can stamp, you can, too!

Sunday, August 23, 2009

Finally!


Hi, stampers! I'm sorry about all the mess and changing blogs and everything, but it will all become clear in a moment. First, here is a sweet little something I cooked up just for you. It's not the best photo, but that is yet another story...
Any how- I got a BUNCH of new toys to play with as I received my new Stampin' Up! Demonstrator's Kit Friday afternoon! Is that exciting, or what! This stamp set (On a Pedestal) was in it! So were ALL the in-color ink pads and card stock! What a deal! Featured here is one of the in-colors, Soft Suede. I paired it with Pretty in Pink and a Sweet Swirl (wheel) of Choc. Chip, added a Real Red cherry, some pink pencil eraser polka-dots, and tied on a striped grosgrain bow, and there you have it.
If you'd like to have a bunch of new stamp sets, ink, and card stock, you might think about joining Stampin' Up! while they have this great special sign up promotion going. It ends August 31, but until then, you can either get the in-color ink pad and card stock and a stamp set for $85 or get the full kit and they throw in all the in-color ink and card stock! Besides, I'm pretty sure that "If I can stamp, you can, too!"
I'd appreciate it if you'd leave me a comment to let me know you found my new home. :) Thanks for stopping by to look.

Saturday, August 15, 2009

LNS Challenge 32-For the Kids


Here is my take on this challenge. I guess I kind of took ideas from the pillow box on page 141 and the card on page 140, but ultimately, this is what I came up with. I hope it wasn't cheating to ask my 11 year old which paper colors she liked best....I'm sure if I'd had any Tempting Turquoise, she would have picked it over the Taken with Teal, but....we all have to work with what we have on hand.

Anyhow....all ingredients are current SU!

Card Stock: Taken with Teal, Rose Red, Whisper White Ink: Rose Red Accessories: 1 1/4 inch circle punch, Scallop Circle Punch, WW Taffeta Ribbon, Big Shot, Pillow Box Die, candy.

I thought it turned out cute. It would make a great favor for a girl's birthday party. Let me know what you think and remember, if I can stamp, you can, too!

Sunday, August 9, 2009

monochromatic daisies

Is everyone ready for "back to school"? We spent all of yesterday shopping for school clothes. We had the supplies bought, but now there is the laundry, the labeling and all that fun stuff left to do. While I hate to see summer ending, it will be nice to get back into a regular schedule. It's really hard to get up early and get off to work with the kiddos getting to sleep in!

I know! I know! It's much more hectic in the mornings when they are up and about, but I think that they are looking forward to it, too.

Now...on to what you really came here for.

I decided to combine the Saturday Sketch Challenge over at Stamping 411 with the challenge at the LNS yahoo group this week. Here's what I came up with.(All ingredients are SU!)

I guess I'm on a daisy kick. It's just such a fun set to play with. For this card I used Regal Rose and Rose Red. Oh, and a touch of WW cardstock. The ribbon is the double stitched grosgrain (not the greatest bow, but I'm still working on making the larger ribbon into pretty bows), the stamp sets are Upsy Daisy and Great Friend, and I used a 1 1/4" circle punch and the scalloped border punch. If you want more detailed instructions, leave me a comment and let me know. Tell me what you think! And remember, if I can stamp, you can, too!

Wednesday, August 5, 2009

Stamping with my sis

Hello again. I told you I'd share what I was up to with my sister over the weekend, so, here we go. It's always more fun to stamp with another stamper, so my sister (and sometimes another friend) and I get together every so often and play with our stamps. Last weekend she came to my house (hmm...I bet she always wants to come to my house because I have a Big Shot...) and we had a GREAT time making cards and 3-D items. Here's what I made.


All SU! ingredients unless otherwise noted.


Daisy card: cardstock: WW, Brocade Blue,
ink: Summer Sun, Brocade Blue, Garden Green, other: paper snips, dimensionals, white satin ribbon (colored with summer sun marker), markers in Summer Sun and Pumpkin Pie,
Stamps: Upsy Daisy


Pillow Box: Card stock: Brocade Blue,
Ink: Chocolate Chip, Garden Green, Old Olive,
Stamps: Branch Out, Great Friend
Other: Big Shot, Pillow Box die, 2 Way Glue Pen, glitter

Mini Pizza Box: cardstock: Pink Pirouette, Bravo Burgundy, Always Artichoke
Ink: Always Artichoke, Bravo Burgundy
Stamps: Yummy
Other: Scallop Circle Punch, 5 Petal Punch, non-SU! pearl stickers.
You may have noticed that one flower on the daisy card is popped up. Well, I have to confess that I am NOT a detailed cutting freak! It was just one of those "opportunities for creative embellishment." LOL I got carried away with my marker and "shading" that one flower. SO...out came the stamp and I re-tamped and cut out THAT flower and "fixed" it. No fatal mistakes. LOL
Until next time, remember, if I can stamp, you can, too!

Sunday, August 2, 2009

Special bonus on this post

Hey, guys! I can now show you what I won from Lori's 3rd Anual Birthday Card Contest. It is the most awsome prize.
Yes. The Medallion Background stamp! If you have been thinking about this stamp from Stampin Up!, let me tell you, get it! It is fabulous! I have played with it and my sister, who came over today, wanted to take it home with her. She said it was going to the top of her wish list. Anyhow, I hadn't shown it to you because I sent this card to Lori to thank her for her generous prize and wanted to give it time to get there first. Check out her blog here.

Here's the bonus I promised you. My DD has been making cards and stuff with me and she made this card and wanted me to post it.


This one is her baby. I didn't help her at all. She chose the colors, designed her layout and even thought of decorating the insde all on her own. Let her know what a great job she did by leaving a comment.

I'll show you what my sister and I were up to today later this week. Remember, if I can stamp, you can, too.

Tuesday, July 28, 2009

I can't believe it!

I NEVER thought I'd use this template. I have to admit that I find it a bit on the vulgar side in it's original format. BUT my boss's birthday is coming up and she's fond of telling people to put ont their "big girl panties and deal with it." AND she's been complaining about her upcoming age for almost a year now. SOOOO......this seemed the most fitting card to make for her and my sister just insisted that I show it to you, so here it is.....

I hope I have not offended your sensibility. I altered the original template which I found a link for at SCS to create a more modest coverage. I also enlarged the whole thing quite a bit (as I needed it to be big enough for everyone at work to sign it). The tag and the sentiment are my own. I printed them on my ink jet. Anyhow.....let me know what you think.

Remember! If I can stamp, you can too!

Monday, July 27, 2009

I'm baaaa-aaack!

I didn't mean to be gone so long. After getting back to work last week, child number 2 decided to give us 3 days notice that he was taking a "working vacation" in another state leaving us 3 days to find another sitter for child number 4. ACCKKK!!! Then of course was the Royal Blog Tour which I HAD to view. If you haven't checked it out, you MUST!!! Just go to Royalblogtour.blogspot.com and climb aboard one of the carriages that await. There is some great talent out there!


Speaking of talent....here's my August birthday card for my BFF in Missouri. I stamped the Soft Summer (retired from the Occasions Mini) dogwood image in Pink Pirouette and the outline in Regal Rose, and it's been a few days, so I'm sorry that I think the leaves are Old Olive and Garden Green on Whisper White. I mounted that on some scrap turqoise cardstock from my stash and added some yummy 1 1/4 inch Pink Pirouette ribbon all on a whisper white card base. She loves dogwood, so I know she'll like this.

OH!!! I almost forgot to tell you! I won a birthday card contest and got the most amazing prize! Want to know what it is? Well, I'm working on a project and can't show you just yet, but head over to Lori's Stamping Spot and (first look at her Royal Blog Tour enties and then scroll down ) see what she sent me. It is SO cool! Her blog is great, too. She's a very talented lady.

Well, until next time, just remember, if I can stamp, you can, too!

Saturday, July 18, 2009

Saturday Sketch Challenge 108


Here is the sketch for this week over at Stamping 411 and my interpretation of it. I had a LOT of "blank" space so I chose a "busier" DSP for my background. I took the liberty of enlarging my images by quite a bit and punched my image to attach it. I didn't have any Tempting Turquoise paper, so I sponged some Whisper White with the ink and punched it out with the scalloped circle punch. The flowers are stamped with Green Galore and the Polka Dot Punch stamp set from SAB 2009. The sentiment is from sweet Little Sentiments and the DSP is Sweet Slumber (both which retired 7/1/09). I thnk it looks better IRL. The camera really washed the color out of this one! Let me know what you think, and remember, If I can stamp, you can, too!

Thursday, July 16, 2009

Late Night Stampers Challenge 28


All SU! materials
cardstock: Elegant Eggplant, Taken With Teal, Regal Rose, Whisper White
ink: Regal Rose, Elegant Eggplant, Taken with Teal
stamps: Great Friend
accessories: scallop border punch, white organza ribbon, dimensionals

This is the card I made for the challenge over at Late Night Stampers. I just joined and the challenge looked like fun. We were to make a non A2 card. Mine is a 5 1/2" square. I stared with an Elegant Eggplant cardbase. The next layer is Taken with Teal and then Regal Rose. I stamped the teal layer with the leaves stamp in Taken with Teal, added the Regal Rose layer which had a small hole punched in it to accomodate the ribbon and stamped three butterflies
in Regal Rose. I used the Rock and Roll method with teal on 2 of them and eggplant on the other one. I layered the sentiment on eggplant cardstock after I stamped in in teal on white. Let me know what you think!

Wednesday, July 15, 2009

White flowers on a turquoise sea


I'm back with another card. I hope you guys like this one. There isn't even any stamping on it. Can you believe that!
I ran my turquoise cardstock through the Big Shot with the small dots texture plate. I punched both sides of my black cardstock strip with a Fiscars Rope border punch and stuck it on with snail. The flowers are punched from vellum and attached with black/silver brads. I attached all of this to a white card base that I used a Cuttlebug border embossing folder on across the bottom. I just love how the flowers look! Leave me a comment and let me know what you think of it. I'm off to try to play along with the Late Night Stampers Yahoo Group challenge for this week. I hope you're having a great evening. And remember, if I can stamp, you can, too!

Saturday, July 11, 2009

411 Sketch Challenge 107


Here is my card for the Saturday Sketch Challenge this week at Stamping 411. You should check out the challenge and play along, too.
This was the perfect inspiration for a birthday card for my DS1. He's 26 this month. I flipped the sketch on it's side for this card. I used the retired stamp set Penguin Paradise. I stamped the penguin on Whisper White card stock and colored him in with ink spots and a blender pen. I then stamped the Happy Birthday (Stampabilities) in black and all the musical notes in Kiwi Kiss both on Kiwi Kiss cardstock. I used my scallop border punch on Basic Black cardstock to make a "rope" which I used to separate my sentiment and the musical notes. Next I punched a scalloped circle from Pacific Point card stock, cut out my little penguin guy and attached him to that which I popped up on dimensionals. I attached the Kiwi Kiss layer to my Pacific Point layer and mounted the whole thing on a card base of Tangerine Tango. I started to put it all on a white card base, but it was lacking. I thought the orange gave it a more tropical feel. I hope you like it! Let me know.

Friday, July 10, 2009

Cool border punch technique


Hello, everyone! I hope you had a great week and are looking forward to an even better weekend. I've been home this week on vacation. You know, the kind that means you just don't go to work... We did have fun, though. We took the kids to see fireworks and to a theme park, cooked hot dogs on the grill, ate watermelon out in the backyard. You know, all the fun summertime stuff.
Here's a card I made this morning. My DD is always asking me if I "thought that up myself or did somebody else do it first?" so.....
I got a new border punch and I wasn't happy with the way it was punching. I was messing around with it and said to myself "Hey, self," I said. "That looks pretty cool. I wonder what you could do with that?" I'm sure I'm not the first person that has done this, but I can say that I hadn't seen it somewhere before I made this card. That made DD quite happy. She told me it was "WAY COOL, Mom!" Leave me a comment and let me know if you like it.
Cardstock: Baja Breeze, Pink Pirouette, Very Vanilla, Basic Black
Ink: Baja Breeze
Stamp: dollar bin at Michael's
Accessories: Big Shot, SU! Texture plates for the big shot, pearl stickers, scallop border punch

Monday, June 22, 2009

Father's Day Cards 2009


Here are the cards I made for Father's Day. The top one is what I made for my FIL. I know, I know. It's "supposed" to be a pitcher of lemonade. However, my FIL LOVES iced tea, so..... The yellow paper started out white and I used direct to paper with SU! Yoyo Yellow. I also used Pacific Point paper and ink. I stamped the image in black and colored it in with SU! pastels and a blendy pen.
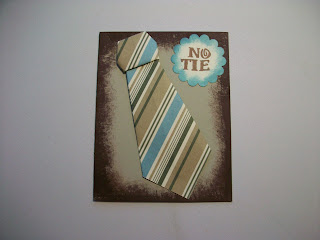
The second card is what I made for my dad. He is a bit of a jokester, so I told him he was getting a tie for Father's Day just like he did umpteen years ago when I was a kid. I had seen folded ties on SCS, but had trouble finding a tutorial until I looked here http://www.activityvillage.co.uk/origami_tie.htm.
I folded the tie out of Manchester DSP and attatched it to a Sahara Sand Card. I sponged very heavily around the edges of the cardstock with my Chocolate Chip ink and around the scalloped circle punch with Baja Breeze. The sentiment is stamped in Chocolate Chip with Jive Alphabet by All Night Media .
OK. Now it's your turn to stamp!